


Using the Amazon AWS CLI to interact with your cloud account is powerful and essential. In the cloud we are encouraged to "codify all the things". In other words we should write code to setup everything we do in the cloud, and there is good reason to do this and I strongly encourage you to look further into how you can do this.
Nearly every framework at it's core will make use of the aws cli in some fashion. All the beginner documentation around using the AWS CLI or other serverless frameworks document setting up the core AWS Access Key or Secret when interacting with the cloud. Whilst this is mostly fine and okay, I feel its not completely secure. If your computer where you store your access key and secret is compromised in anyway then there is potential for your AWS credentials, the key to your cloud credit card to be compromised and this could be a serious problem. Most of the time we all follow the general tutorials and logon using our root account, go to the IAM console and create an Access Key and Secret for our AWS account, for the root user with the MOST access to your cloud. I actually feel really uncomfortable writing this because this setup for me is wrong, really wrong. Don't take this statemnent out of context, 99.999999999% of the time the setup and tutorials are fine and mostly okay so far as security goes but it could be better.
As an enterprise cloud application architect I feel duty bound to look at the security of everything I do or allow to be done in relation to my cloud account. Step number one for securing any account is to ensure that we are always using more than one mechansim to authenticate every logon, Multi-Factor Authentication (MFA) and this is possible to apply to the AWS cli and most frameworks that interact with AWS to deploy your applications.
Creating a User for Secure Access
It is possible to apply Multi-Factor authentication using the aws-cli through the use of the AWS Security Token Service (STS) and by setting up a new IAM User specifically for all your framework interactions via the cli. I strongly recommend against using your root account logon for doing any aws-cli interactions with your AWS account other than for online console access. So lets get started with setting up a new IAM user and enforce MFA for all operations.
Creating a new IAM Policy - ForceMFA
The first thing I setup is a new IAM Policy that will allow access to everything but which also requires the existence of Multi-Factor Authentication. The following steps assume you are logged on as an admin user to your AWS account.
- Navigate to the IAM console
- Under Access Management select Policies
- Click Create Policy button
- Click on the JSON TAB to get the JSON editor
Copy the following into the policy editor:
 {
     "Version": "2012-10-17",
     "Statement": [
         {
             "Effect": "Deny",
             "Action": "*",
             "Resource": "*",
             "Condition": {
                 "Bool": {
                     "aws:MultiFactorAuthPresent": "false"
                 }
             }
         }
     ]
 }
The key to this policy is the Condition which says if MFA is not present "aws:MultiFactorAuthPresent": "false" then the Effect of Deny should be applied to all resources and all actions.
- Click the Next button
- Click Next again to review the policy
- Enter the name for your policy ForceMFA
- Scroll down and click Create Policy
This is the perfect policy to enforce use of MFA for the aws-cli user we will setup next.
Creating a new IAM Group
This part is not actually neccessary but I like to setup a group that has our new ForceMFA policy attached so that any future Users that I create I can simply assign to the same group.
- Navigate to the IAM console
- Under Access Management select Groups
- Click Create New Group to start the wizard
- Type the group name and press Next
- Next attach the ForceMFA policy using the filter box to find it
- Tick the checkbox next to ForceMFA policy
- You will also need to provide more permissions so the user can create resources, to make life simple I use AdministratorAccess so I can deploy all services and since we have MFA in place there is further protection.
- Press Next to review the Group details.
- Click Create Group to complete group creation
Creating the new User for CLI access
Now lets setup the new user using the new User Group we just created.
- Navigate to the IAM console
- Under Access Management select Users
- Click the Add User button to start the wizard
- Type the name of the user in the box at the top
- At the bottom you get to choose one of two options for Access Type
- Lets tick the first one and force this to be Programmatic access only so we know there is no Console access granted.
- Click next and we come to Add User to Group
- At this point we should see the Group you just created, if not hit the refresh button and it should appear.
- Tick the box next to our new Group
- Now press Next and we get to Tags, add any Tags if you want to the user.
- Click Next to review your changes and press Create user to create the new user.
- The next screen is important it shows the API Access Key and Secret for your new user. Press the Download .csv button to download a csv file with the new credentials which we will need later.
Important Note: This is the only place where the actual Secret access key is displayed or available so make sure you complete the last step and download the .csv or take note of both the Access key ID and the Secret access key.
At this point in time we have a new user with programmatic access using an Access key ID and Secret Access Key. At this point we can try to use the aws-cli using just these and you should not be able to access anything at all - AWS should Deny all access since we have not setup MFA yet.
Enabling MFA for your User
The following steps will walk you through setting up MFA on your new user.
- Navigate to the IAM console
- Under Access Management select Users
- Locate the new user you have just created and click the name to go to the User details.
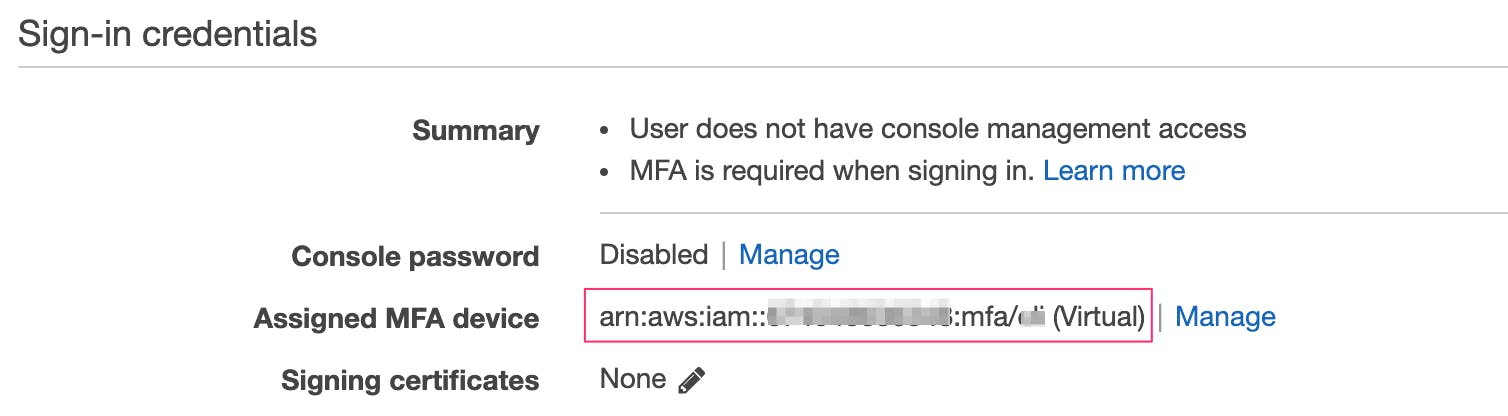
- Click the Security credentials TAB
- On the Assigned MFA Device line click the Manage link to setup MFA
- The most common option to choose will be Virtual MFA Device which means something like Google Authenticator, this is what I am going to use today.
- With Virtual MFA Device selected click Continue
- Follow the steps for installing a compatible application if you do not have one already
- Click Show QR Code and scan the code using your authenticator application OR click Show secret key and enter this to setup the authenticator.
- Now lets complete this setup by typing in 2 consecutive MFA codes as they change in the app and ensure we are correctly synced.
- Click Assign MFA to complete the setup.
At this point we now have a new programmatic access only user with MFA turned on and we can now prepare to use this from the command-line using the AWS Security Token Service (STS) to get a token for use by the cli.
Using MFA with the aws-cli
In order to set this up I have created a shell script to call the STS get-session-token and store the temporary credentials into the shell environment so that the aws-cli will work. The awsenv script can be found here{:target="_blank"}.
The awsenv shell script assumes the following:
- sed is available in your shell environment
- jq is available in your shell environment
- bash shell is available for executing the script
- aws-cli is installed and available in your shell environment
- assumes a bash-like shell environment
- Profile folder exists in ~/.aws/profiles
A file exists for each user in the profile folder and contains the following details:
  export AWS_ACCESS_KEY_ID=<ACCESS_KEY_ID>
  export AWS_SECRET_ACCESS_KEY=<SECRET_KEY>
  export AWS_DEFAULT_REGION=ap-southeast-2
  export AWS_ARN_MFA=arn:aws:iam::111111111111:mfa/user-device-name
AWS_ACCESS_KEY_ID: Is the Access key ID from the IAM console for your cli user.
AWS_SECRET_ACCESS_KEY: Is the Access Secret Key downloaded in the csv file when we created the IAM user in the console.
AWS_DEFAULT_REGION: This is simply a conveninece to set the default region for aws-cli commands.
AWS_ARN_MFA: Is the ARN for the MFA device which is available on the Security tab of the IAM User. The highlighted section of the security TAB shows the MFA ARN you need to have in the profile.
The awsenv is a shell script so we are unable to EXPORT new environment variables by executing the shell-script. Instead you source the script into your environment and pass in the command-line parameters as follows.
$ source awsenv user-profile <MFA number>
Once you do this the awsenv script will source the user-profile file from $HOME/.aws/profiles folder setting up the core required details for calling aws sts get-session-token.
the get-session-token command will return temporary access token credentials in JSON similar to the following.
    {
          "Credentials": {
           "AccessKeyId": "AKIAIOSFODNN7EXAMPLE",
           "SecretAccessKey": "wJalrXUtnFEMI/K7MDENG/bPxRfiCYzEXAMPLEKEY",
           "SessionToken": "AQoEXAMPLEH4aoAH0gNCAPyJxz4BlCFFxWNE1OPTgk5TthT+FvwqnKwRcOIfrRh3c/LTo6UDdyJwOOvEVPvLXCrrrUtdnniCEXAMPLE/IvU1dYUg2RVAJBanLiHb4IgRmpRV3zrkuWJOgQs8IZZaIv2BXIa2R4OlgkBN9bkUDNCJiBeb/AXlzBBko7b15fjrBs2+cTQtpZ3CYWFXG8C5zqx37wnOE49mRl/+OtkIKGO7fAE",
            "Expiration": "2021-03-09T18:06:10+00:00"
          }
    }
Which is where jq comes in to strip out the credentials ad store them in standard aws-cli environment variables. Now that we have done this we can use the aws-cli or any othe framework command which interacts with the aws-cli to deploy cloud services.